
概要
React+Reduxの学習で、Reactチュートリアルの三目並べにReduxを使って書き直してみました。
このシリーズではチュートリアル形式で書き方を解説していきます。
今回はその第1弾として、connect APIを使い、JavaScriptで書いてみます。
参考文献
この記事は以下の情報を参考に執筆しています。
- りあクト!第3.1版
- React公式チュートリアル
- react-redux公式チュートリアル
- Reactのprops drilling(バケツリレー)とhooksに我々はどう立ち向かっていけばよいのか : ビジネスとIT活用に役立つ情報
コードを書く前に|Reduxについて
Reduxとは?
そもそもどういうものなのかの簡単な解説です。
よく言われますが、状態管理のライブラリです。
Reactと切り離された場所で情報を保持し、変更したり取り出したりすることが可能になります。
なぜ外部の状態管理が必要か
React本体だけでもstateとpropsを用いて状態を保持し、変更することは可能です。これは単一のコンポーネントでは機能しますが、複数のコンポーネントで情報を共有しようとすると、次のような実装になってしまいます1。
// ※イメージです
<ParentComponent>
  <ChildComponent1 props={<親コンポーネントのstateの値>}>
    <GrandChildComponent props={親コンポーネントから子コンポーネントにpropsで渡されたstateの値} />
  <ChildComponent1 />
  <ChildComponent2 props={<親コンポーネントのstateの値>} />
</ParentComponent>
親コンポーネントにstateを持たせておき、子コンポーネントにそれをpropsで渡すという手法です。
階層が浅く、コンポーネント数も少なければ機能しますが、大規模になると子コンポーネントのpropsに親コンポーネントのstateを渡す作業が何度も発生し、煩雑になります。これは"props drilling"と言うそうで、いわゆる「propsのバケツリレー」です。
そこで、コンポーネントの階層や数に関係なく、どこからでもコンポーネントに必要な情報にアクセスし、管理できるものが必要です。
その一つがReduxというわけです。
Reduxの仕組み
よくReactとReduxはセットのように扱われますが、React以外にも使うことができる状態管理ライブラリで、Fluxというアーキテクチャがもとになっています。
この詳しい説明は他書籍や記事にお任せするとして、ここではreduxの実装に必要な情報を簡単にまとめたいと思います。
以下の図はredux公式で用いられているgifを引用したものです。
Reduxの概念図(redux公式サイトより引用)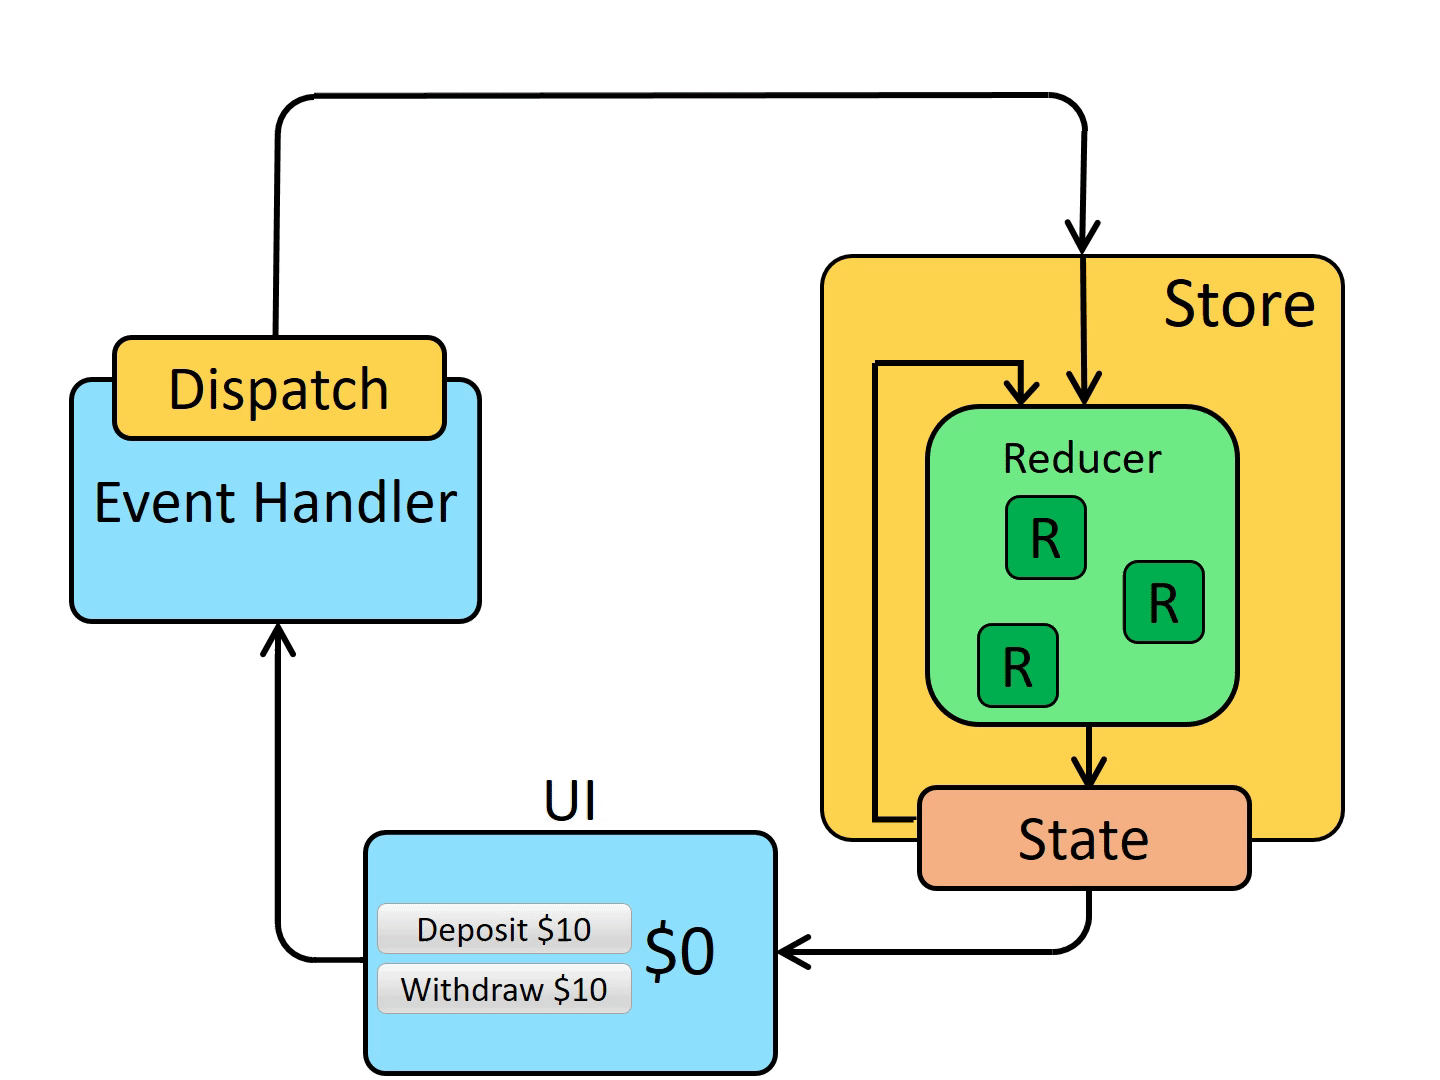
まず、情報を格納するのはstoreと呼ばれる場所です。ここにstate(reactのstateとは異なる)という名前で情報が保存されます。 実際にUIで使用する場面では、Reactのコンポーネントからstoreに格納されたstateに接続するというわけです。それが図で言うと「state」から「UI」に向かっている矢印です。
stateの内容を変更したいときは、自由に設定できるreducerと呼ばれる関数を使用します。reducerは「変更前のstate」を引数に取り、「変更後のstate」を返す関数です。
これはちょっとだけ嘘で、正確にはreducerの実行には、
- 変更するstate
- どのような変更をするかを記述したもの(action)
の2つを引数に取り、
- 変更後のstate
を返す関数です。 ここで、actionは関数ではなく、stateに対してどんな変更をするかをreducerに伝えるための、ただのオブジェクトです。 そしてこのactionを発行するのがdispatcherです。
つまり、このgifの内容を言葉で説明すると、
- UIはstoreからstateを呼び出し、値を表示する
- UIのボタン(Withdraw, Deposit)が押されると、dispatcherは押されたボタンに対応するactionを生成する
- dispatcherはactionというオブジェクトを生成し、storeにあるreducerに送る(※正確にはaction creator関数を呼び出します。ここは後で解説します)
- reducerは変更前のstateと送られてきたactionの情報をもとに、新たなstateの値に更新する
- stateが更新されると1.に戻る
ここまでの内容をもとに、実際にコードを書いていきます!
本編
ここからが本題です。
最新のReactはHooks APIなるものが登場し、この記事で扱うconnectよりもスマートに書けるようになったようです。
また、TypeScriptで書くことが主流になりつつあります。
しかし、Hooks登場以前のコードがほとんどなのに加え、TypeScriptでconnectを使った実装は型の理解がちょっと大変だったので、先にJSでの実装を解説します。
(ちなみに、私rikutoが現在いる会社でも、connect&JSです)
事前準備
ちょこっとリファクタ
Reactの公式チュートリアルが完了した状態からスタートします。公式チュートリアルが終わると、index.jsは次のようなコードになるはずです。
同一のファイルに複数のコンポーネントが混在した状態なので、ちょこっとリファクタしてコードを分割します。
これでこの後の操作がちょっとわかりやすくなるはずです。
ファイル構成は以下のようになっています。
- src/
  - components/
    - Board.js
    - Square.js
  - Game.js
  - index.js
  - index.css
  - functions.js
※単純にコンポーネントをファイルで分割しただけですが、ファイル構成は「りあクト!」を参考にしました。この本の読者の方向けの情報ですが、分割の仕方は本と全く同じではなく、見た目とロジックは切り離していません。
stepNumberとxIsNextをstoreへ
このコードで使われている状態は3つあります。
- stepNumber
- xIsNext
- history
stepNumber (type: number) とxIsNext (type: 'X' | 'O' | null)はシンプルなデータなので、初めにこの2つをstoreに入れることを考えます。
Storeの準備
最初に、reduxをreactで使えるよう設定します。
yarn add redux react-redux
(npm install)
このコマンドでreduxとreact-reduxを追加します。前者はredux本体で、後者はreduxをreactで使えるようにするためのラッパーです。 reduxはreact以外でも使えるので、フロントエンドのライブラリとつなぐときにはこのようなラッパーが必要になります。
まず、index.jsから。
import React from "react";
import ReactDOM from "react-dom";
import { createStore } from "redux";
import { Provider } from "react-redux";

import { gameReducer, initialState } from "./reducer";
import "./index.css";

import Game from "./Game";

const store = createStore(
  gameReducer,
  initialState,
  window.__REDUX_DEVTOOLS_EXTENSION__ && window.__REDUX_DEVTOOLS_EXTENSION__()
);

ReactDOM.render(
  <Provider store={store}>
    <Game />
  </Provider>,
  document.getElementById("root")
);
まず、const store=...で書かれたところでは、reduxライブラリが提供するcreateStoreを使ってstoreを作っています。
storeはstateとreducerからなるという話をしましたが、この関数の引数gameReducer, initialStateがそれです。
(※正確にはinitialStateはstateの初期値です)
この2つの引数については、'reducers.js'で定義していますので、後ほど見ていきます。
第3引数の window.__REDUX_DEVTOOLS_EXTENSION__ && window.__REDUX_DEVTOOLS_EXTENSION__()は、ブラウザの拡張Redux Dev Toolsを使うための設定です。拡張を使わなければ省略しても構いません。
説明は省略しますが、詳しくはRedux DevToolsのGithubをご覧ください。
次に、
ReactDOM.render(
  <Provider store={store}>
    <Game />
  </Provider>,
  document.getElementById("root")
);
の部分ですが、<Provider/>にstoreをpropsで渡し、Gameコンポーネントを内包しています。
このProviderコンポーネントによって、子コンポーネントであるGameにstoreのstateを渡すための準備ができます。
「準備」と書いたのは、stateは子コンポーネントにpropsとして渡されるのですが、実際は渡すための処理が別に必要だからです。後で解説するmapStateToPropsがこれに該当します。
ActionとReducerの定義
続いてActionです。おさらいですが、ActionはReducerに渡すもので、stateを変更する内容を表した単なるオブジェクトです。
src/actions.jsを新規作成し、以下のようにします。今回実装するActionは、ボードにOかXを置く(Place)操作なので、PLACEという名前にしています。
// src/actions.js

export const ActionType = {
  PLACE: "PLACE",
};

export const place = (stepNumber, xIsNext) => ({
  type: ActionType.PLACE,
  stepNumber,
  xIsNext,
});
まずActionTypeを定義している部分では、PLACEを文字列リテラルにして定義しています。typeを'PLACE'のような単なる文字列ではなく、定数で定義するのには理由があります。1つは、再利用可能にすること、もう一つはタイプミスによるバグを防ぐという目的によるものです。type: PLASEみたいなタイプミスを防げます。
その下のexport const place => ... はActionを作る関数で、Action Creatorと呼ばれます。Actionを生成するときは、直にオブジェクトを作るのではなく、このAction Creatorを使用して行うことになっています。目的は上と同様でバグ防止です。
ちなみにですが、この場合のActionは
{
  type: 'PLACE',
  stepNumber: 3,
  xIsNext: false
}
のようなオブジェクトです。
Reducer
次にReducerです。src/reducer.jsを作成し、次のようにしてください。
import { ActionType } from "./actions";

export const initialState = { stepNumber: 0, xIsNext: true };

export const gameReducer = (state = initialState, action) => {
  switch (action.type) {
    case ActionType.PLACE:
      return {
        ...state,
        stepNumber: state.stepNumber + 1,
        xIsNext: !state.xIsNext,
      };
    default:
      return state;
  }
};
initialStateは文字通りstateの初期状態です。stepNumber=0とxIsNext=trueはredux導入前のコードと同じ内容です。
そしてその下のgameReducerが今回作成したReducerです。
Reducerは更新前のstateとactionを引数に持ち、更新後のstateを返す関数ですが、その通りになっていることがわかるかと思います。
Connect APIの登場
ここまでで、State、Action、Reducerを定義できました。ここからはreactのコンポーネントにreduxを接続し、actionをdispatchしたり、reduxのstateをコンポーネントに渡して表示したり、ということをやっていきます。
それが、今回の記事で扱うconnect()という関数で、Connect APIと呼ばれます。
mapDispatchToProps
まずは定義したPLACEというActionをDispatchし、ReduxのStateを更新することをやっていきましょう。
Game.jsを次のように編集します。
import React from "react";
+++ import { connect } from "react-redux";
import Board from "./components/Board";
+++ import { place } from "./actions";

import { calculateWinner } from "./functions";

class Game extends React.Component {
  constructor(props) {
    super(props);
    this.state = {
      history: [
        {
          squares: Array(9).fill(null),
        },
      ],
      stepNumber: 0,
      xIsNext: true,
    };
  }

  handleClick(i) {
    const history = this.state.history.slice(0, this.state.stepNumber + 1);
    const current = history[history.length - 1];
    const squares = current.squares.slice();
    if (calculateWinner(squares) || squares[i]) {
      return;
    }
    squares[i] = this.state.xIsNext ? "X" : "O";

+++    this.props.place(this.state.stepNumber, this.state.xIsNext);

    this.setState({
      history: history.concat([
        {
          squares: squares,
        },
      ]),
      stepNumber: history.length,
      xIsNext: !this.state.xIsNext,
    });
  }

  jumpTo(step) {
    this.setState({
      stepNumber: step,
      xIsNext: step % 2 === 0,
    });
  }

  render() {
    const history = this.state.history;
    const current = history[this.state.stepNumber];
    const winner = calculateWinner(current.squares);

    return (
      <div className="game">
        <div className="game-board">
          <Board
            squares={current.squares}
            onClick={(i) => this.handleClick(i)}
          />
        </div>
        <div className="game-info">
          <div>
            {winner
              ? "Winner: " + winner
              : "Next player: " + (this.state.xIsNext ? "X" : "O")}
          </div>
          <ol>
            {history.map((step, move) => (
              <li key={move}>
                <button onClick={() => this.jumpTo(move)}>
                  {move ? "Go to move #" + move : "Go to game start"}
                </button>
              </li>
            ))}
          </ol>
        </div>
      </div>
    );
  }
}

+++ export default connect(null, { place })(Game);
まず、冒頭のimport文でconnectとAction Creatorのplaceをインポートしています。
次に追加したのは、handleClickメソッドのthis.props.placeですね。これは先ほどactions.jsで定義したplaceです。
ではなぜplace単体ではなくthis.propsになっているのかといえば、このAction CreatorであるplaceをReduxのDispatcherとつなぎ、つながれたDispatcherはpropsとしてコンポーネントに渡されるからです。
ちょっとこの表現ではわかりづらいかもしれないですね。このあと定義するmapDispatchToPropsを考えましょう。これは「Dispatch(er)をPropsにmap(写す)」という意味です。つまり、定義したDispatcher(ここではplaceという関数によってPLACEがDispatchされる)をPropsに渡すということです。
ちなみに、mapは数学では「写像」という意味になります。よく線形代数や複素解析で使われます。いろいろなプログラミング言語でarray.map()というような関数がありますが、これもその意味で使われています。
ここで、this.props.place()の引数はthis.stateの値になっています。これはコンポーネントのstateであり、reduxのstoreに格納されたstateではありません。今は簡単のためコンポーネントのstateを使いますが、後からstateはreduxのstateを使用することにします。
connect()
次に、本題のconnect()です。これは、ReduxのStateとDispatchをコンポーネントと接続するHOC(Higher Order Component)の関数です。
一般に次のように表現できます。
connect(mapStateToProps, mapDispatchToProps)(Component)
これによって、コンポーネントは以下のような状態になります。
// イメージです
<Connect>
    <Component props={StoreとDispatcher}/>
</Connect>
コンポーネント(Component)がconnectというHOCの関数によって内包され、propsにStoreとDispatcherが渡されるようになります。 storeとdispatcherをコンポーネントにconnectするのでconnect関数です。
このコードでは、以下のようになっています。
connect(null, { place })(Game);
第一引数のmapStateToPropsがnullなので、stateはreduxとつながれていない状態です。第二引数のmapDispatchToPropsにはAction Creatorであるplaceが渡されています。これにより、Gameコンポーネントにplaceがpropsとして渡されるようになるわけです。
なお、mapDispatchToPropsは関数として、このように書くこともできます。
const mapDispatchToProps = (dispatch) => ({
  place: (stepNumber, xIsNext) => dispatch(place(stepNumber, xIsNext)),
});

export default connect(mapStateToProps, mapDispatchToProps)(Game);
Connect APIによってdispatch関数が渡されるようになっているので、それを利用した形です。こちらの方がdispatchという単語が入ってわかりやすいかもしれません。
ちなみに公式推奨はAction Creatorをオブジェクトで渡すスタイルです(参考)。
この記事でもオブジェクトを渡すスタイルを採用します。
Redux DevTools
ここまでできたら、ブラウザに表示して確認します。Redux DevToolsを使用して確認します。アプリケーション側の設定は「Storeの準備」でcreateStoreを作った時に完了しているので、インストールすればすぐに使えるはずです。
インストールしたら、ブラウザの開発者ツールでreduxを選択するか、拡張のredux devtoolsアイコンをクリックしてください。
実際にマスをクリックすると、PLACEアクションが発火し、stateが更新される過程を見ることができます。

ここまでの完成コードはこちら↓
https://github.com/riku929hr/react-tutorial/commit/3a74655fbf92d08dc81d069f2743d63a363dd581
mapStoreToProps
次はthis.stateを使用してコンポーネントの stateを使っていたところを、mapStateToPropsを定義してReduxのstateを使うようにしていきましょう。
Game.jsのexport default...を次のように変更します。
// Game.js

- export default connect(null, { place })(Game);

+ const mapStateToProps = (state) => ({
+  stepNumber: state.stepNumber,
+  xIsNext: state.xIsNext,
+ });

+ export default connect(mapStateToProps, { place })(Game);
mapStateToPropsはstateを引数にとり、propsに渡したい変数をオブジェクトとして返します。この返されたオブジェクトがconnect()で内包したコンポーネントにpropsとして渡されます。
これでstepNumberとxIsNextをコンポーネントのstateから消し、propsで受け取ったreduxのstateの値を使うように修正します。
    this.state = {
      history: [
        {
          squares: Array(9).fill(null),
        },
      ],
-      stepNumber: 0,
-      xIsNext: true,
    };
  }

...

handleClick(){
-   const history = this.state.history.slice(0, this.state.stepNumber + 1);
+   const history = this.state.history.slice(0, this.props.stepNumber + 1);

...

-   squares[i] = this.state.xIsNext ? "X" : "O";
+   squares[i] = this.props.xIsNext ? "X" : "O";

-   this.props.place(this.state.stepNumber, this.state.xIsNext);
+   this.props.place(this.props.stepNumber, this.props.xIsNext);

...
    this.setState({
      history: history.concat([
        {
          squares: squares,
        },
      ]),
-      stepNumber: history.length,
    });
}

...

-    const current = history[this.state.stepNumber];
+    const current = history[this.props.stepNumber];
...
ここまでの完成コードはこちら↓
https://github.com/riku929hr/react-tutorial/tree/9c071f968e52f1f6e4cbc1be797ca46b8d5a7906/src
よりシンプルなAction
これでstepNumberとxIsNextをreduxのstateとつなげましたが、もうactionで渡すべきパラメータではなくなりました。
mapStateToProps実装前は、stateはコンポーネントに持たせ、reduxはstateの情報更新のためのactionだけの用途でした。
今やstateもredux側に入ったので、stepNumberを1だけインクリメントし、xIsNextを反転させる操作はredux内部で完結します。
従って、以下のように修正します。まずは、actions.jsでactionで受け取っていたパラメータを消します。
// actions.js

...

- export const place = (stepNumber, xIsNext) => ({
+ export const place = () => ({
  type: ActionType.PLACE,
-  stepNumber,
-  xIsNext,
});
そして、Gameコンポーネントでplaceを使用している箇所
// Game.js

...
-    this.props.place(this.props.stepNumber, this.props.xIsNext);
+    this.props.place();
...
ここまでの完成コードはこちら↓
https://github.com/riku929hr/react-tutorial/commit/a6efb4456338ae58e9cbcb8f9393635f0cca25eb
コンポーネントの分割
stepNumberとxIsNextがredux管理になったことで、一部ですがコンポーネントを分割できるようになりました。
勝利判定を行っている箇所を、GameStatusという名前で分割してみましょう。
// src/components/GameStatus.js

import React from "react";
import { connect } from "react-redux";

const GameStatus = ({ winner, xIsNext }) => (
  <div>
    {winner ? "Winner: " + winner : "Next player: " + (xIsNext ? "X" : "O")}
  </div>
);

const mapStateToProps = (state) => ({ xIsNext: state.xIsNext });

export default connect(mapStateToProps)(GameStatus);
mapStateToPropsでxIsNextをreduxからコンポーネントのpropsに渡し、winnerは親コンポーネントからpropsで渡します。
これにより、Gameコンポーネントは以下のようになります。
...
+ import GameStatus from "./components/GameStatus";
...

...
-          <div>
-            {winner
-              ? "Winner: " + winner
-              : "Next player: " + (this.props.xIsNext ? "X" : "O")}
-          </div>

+          <GameStatus winner={winner} />
コンポーネントを分割しても、reduxに格納しておけばどこからでもパラメータを取り出せるのはやはり便利です。
ここまでのコードはこちら↓
https://github.com/riku929hr/react-tutorial/commit/f56e2e574dc1a4cfed75f98be3ef67f6d17fc396
jumpTo関数をActionへ
ここまでで一つ忘れていることがあります。jumpTo関数でthis.state.stepNumberとthis.state.xIsNextを使っています。これは現在の盤の状態を、任意のstepNumberに置き換えるという操作で、Actionにすることができます。以下のように編集しましょう。
// actions.js

export const ActionType = {
  PLACE: "PLACE",
+  JUMPTO: "JUMPTO",
};

export const place = () => ({
  type: ActionType.PLACE,
});

+ export const jumpTo = (move) => ({
+  type: ActionType.JUMPTO,
+  move,
+ });
// reducer.js
...
        xIsNext: !state.xIsNext,
      };
+    case ActionType.JUMPTO:
+      return {
+        ...state,
+        stepNumber: action.move,
+        xIsNext: action.move % 2 === 0,
+      };
    default:
...
// Game.js

...
- import { place } from "./actions";
+ import { place, jumpTo } from "./actions";
...

...
    });
  }

-  jumpTo(step) {
-    this.setState({
-      stepNumber: step,
-      xIsNext: step % 2 === 0,
-    });
-  }

  render() {
...
...
              <li key={move}>
-                <button onClick={() => this.jumpTo(move)}>
+                <button onClick={() => this.props.jumpTo(move)}>
                  {move ? "Go to move #" + move : "Go to game start"}
                </button>
...

- export default connect(mapStateToProps, { place })(Game);
+ export default connect(mapStateToProps, { place, jumpTo })(Game);
jumpToでやっていた操作をreducer.jsに移し、それに対応するActionを作成し、mapDispatchToPropsでコンポーネントに渡しています。なお、jumpToの引数名はstepからmoveに変更しました。説明は上と重複するので割愛します。
ここまでのコード↓
https://github.com/riku929hr/react-tutorial/commit/ffee62bb569478f8981cb5296c3600821be30ce4
historyをstoreへ
あと残すところ、コンポーネントが保持する情報はhistoryだけになりました。
これをreduxにぶち込みましょう。これによってタイムトラベル機能を別コンポーネントで切り出すことができます。
ちなみに、winnerは盤の状態がわかれば計算できるので、reduxが保持しなくてもいい情報だと思います。
Action
まず前提を整理します。historyは次のようなオブジェクトです。
{
  [{
    squares: []
  }]
}
配列のなかにオブジェクト{squares: array}があり、このsquares[]に'X'か'O'が書き込まれていきます。squaresのインデックスに渡すのは、'X'or'O'を置く場所([0-8])です。
ここで今のActionの状態を見てみます。
// 変更前のactions.js
...
export const place = () => ({
  type: ActionType.PLACE,
});
...
どこに置いたか、という情報が足りないですね。引数を追加します。
// 変更後のactions.js
...
export const place = (toWhere) => ({
  type: ActionType.PLACE,
  toWhere
});
...
これでどこに置いたかをredux側で受け取れるので、historyをreduxのstateで持つことができます。
Reducer
次に上記Actionに対応するReducerの操作を書いていきます。
// reducer.js (編集後)
import { ActionType } from "./actions";

export const initialState = {
  stepNumber: 0,
  xIsNext: true,
  history: [{ squares: Array(9).fill(null) }],
};

const updateHistory = (state, toWhere) => {
  const history = state.history.slice(0, state.stepNumber + 1);
  const current = history[history.length - 1];
  const squares = current.squares.slice();

  squares[toWhere] = state.xIsNext ? "X" : "O";

  return history.concat([
    {
      squares: squares,
    },
  ]);
};

export const gameReducer = (state = initialState, action) => {
  switch (action.type) {
    case ActionType.PLACE:
      return {
        ...state,
        history: updateHistory(state, action.toWhere),
        stepNumber: state.stepNumber + 1,
        xIsNext: !state.xIsNext,
      };
    case ActionType.JUMPTO:
      return {
        ...state,
        stepNumber: action.move,
        xIsNext: action.move % 2 === 0,
      };
    default:
      return state;
  }
};
順番に見ていきます。
まずはinitialStateにhistoryの初期状態をいれています。ここは元のコードと同じですね。
その下のupdateHistoryはいったん飛ばして、gameReducerのPLACEアクションを見ましょう。
historyという項目が追加されています。ここがupdateHistoryの戻り値になっていますね。
updateHistoryは、いまのstateと、Actionで渡された'X'か'O'が置かれた場所を引数に取り、更新後のhistoryを返す関数です。行っている操作は元のコードと同じなので、説明は省略しますが、コンポーネントで行っていた操作をReducerに移したということがわかれば大丈夫です。
最後に、Gameコンポーネントです。
...
  handleClick(i) {
    const history = this.state.history.slice(0, this.props.stepNumber + 1);
    const current = history[history.length - 1];
    const squares = current.squares.slice();
    if (calculateWinner(squares) || squares[i]) {
      return;
    }
    squares[i] = this.props.xIsNext ? "X" : "O";

-    this.props.place();
+    this.props.place(i);

...
これでstoreにhistoryが格納されるようになりました。Redux DevToolsで確認します。

historyがreduxのstateに反映されていればOKです。
ここまでのコードはこちら↓
https://github.com/riku929hr/react-tutorial/commit/84aa0ed0b55f9b3d04bb745d0b47af1e7849bab3
mapStateToPropsで表示
あとはmapStateToPropsで、コンポーネントのstateからreduxのstateに情報元を切り替えていきます。
// Game.js

...
-    this.state = {
-      history: [
-        {
-          squares: Array(9).fill(null),
-        },
-      ],
-    };

...

  handleClick(i) {
-    const history = this.state.history.slice(0, this.props.stepNumber + 1);
+    const history = this.props.history.slice(0, this.props.stepNumber + 1);
    const current = history[history.length - 1];
    const squares = current.squares.slice();
    if (calculateWinner(squares) || squares[i]) {
      return;
    }
-    squares[i] = this.props.xIsNext ? "X" : "O"; // 下のGitHubのリンク先のコードでは消えていませんが、消し忘れです...

    this.props.place(i);

-    this.setState({
-      history: history.concat([
-        {
-          squares: squares,
-        },
-      ]),
-    });
  }

render() {
-    const history = this.state.history;
+    const history = this.props.history;
    const current = history[this.props.stepNumber];

...

const mapStateToProps = (state) => ({
+  history: state.history,
  stepNumber: state.stepNumber,
  xIsNext: state.xIsNext,
});
ここまでのコードはこちら↓
https://github.com/riku929hr/react-tutorial/commit/fd521f8200d39a3ded666bfd3ae8d0c216b9e059
タイムトラベル機能を別コンポーネントで切り出す
ここまでできると、タイムトラベル機能を切り出すことができます。src/components/GameHistory.jsを作成し、次のようにします。
import React from "react";
import { connect } from "react-redux";
import { jumpTo } from "../actions";

const GameHistory = ({ history, jumpTo }) => {
  return (
    <ol>
      {history.map((step, move) => (
        <li key={move}>
          <button onClick={() => jumpTo(move)}>
            {move ? "Go to move #" + move : "Go to game start"}
          </button>
        </li>
      ))}
    </ol>
  );
};

const mapStateToProps = (state) => ({
  history: state.history,
});

export default connect(mapStateToProps, { jumpTo })(GameHistory);
ここまでくると説明する必要はないかもしれませんが、mapStateToPropsにhistory、mapDispatchToPropsにjumpToを設定し、propsで受け取っています。ロジックなどは元のコードと同じです。
次に、Gameコンポーネントです。
...
- import { place, jumpTo } from "./actions";
+ import { place } from "./actions";
+ import GameHistory from "./components/GameHistory";
...

        <div className="game-info">
          <GameStatus winner={winner} />
-          <ol>
-            {history.map((step, move) => (
-              <li key={move}>
-                <button onClick={() => this.props.jumpTo(move)}>
-                  {move ? "Go to move #" + move : "Go to game start"}
-                </button>
-              </li>
-            ))}
-          </ol>
+          <GameHistory />
        </div>
...

- export default connect(mapStateToProps, { place, jumpTo })(Game);
+ export default connect(mapStateToProps, { place })(Game);
ActionであるjumpToはGameHistoryコンポーネントに移動したので不要になりました。
何より、コードが以下のようになり、大分すっきりしました。
        <div className="game-info">
          <GameStatus winner={winner} />
          <GameHistory />
        </div>
完成!
これで完成です!
https://github.com/riku929hr/react-tutorial/commit/393dd9b7708fe7cb4303a795c103ca4022c3d4a5
ロジックと見た目の切り離しなど、まだ改善できる細かいところが残っていますが、Reduxを理解するという目的は達成できたと思います!
次回からはRedux Toolkitを使った書き方や、TypeScriptやHooksを導入して理解を深めていきたいと思います!乞うご期待!!!
それでは。